Alinco DR-500 Battery Repair

Problem
If your Alinco DR-510 gives you an erratic screen on power up, and your unit is more than five years old, chances are the memory backup battery needs replacement. The problem is that the battery is located behind the front panel and directly underneath the LCD display. Therefore it can’t be removed unless the display is taken off the board which is a chancy procedure at best.
Solution:
Through the use of Wire Glue, soldering on the delicate circuit board is eliminated, and a new backup battery is installed in a location where it is convenient to change it again in the future. Here are the step-by-step instructions:
Radio Dissasembly
1) Remove the eight screws holding on the top and bottom covers
2) Remove the hex nuts which hold the VFO control and microphone jack on to the front panel.
3) Carefully unclip and remove the plastic front panel from the case of the radio.
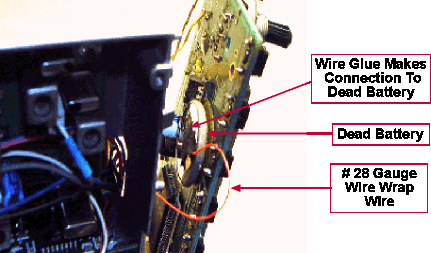
4) Remove the 4 Phillips head screws which attach the front panel circuit board to the case of the radio. Also carefully lift off the sticky-back copper tape which is next to the power switch. As shown in Figure 1, gently pry the front panel circuit board away from the case to expose the backup battery which can be found directly underneath the LCD display.
5) Prepare a 5 inch length of thin insulated wire, such as #28 gauge wire wrap wire, with the insulation removed on one end.
6) Scrape a small patch on the top of the battery with a small screwdriver.
7) Tape the insulated wire to the battery such that the bare wire is in contact with the scraped area.
8) Using a toothpick mix the Wire Glue thoroughly and then using a second toothpick apply a small quantity of Wire Glue to bond the wire to the battery. Note: Allow the Wire Glue set-up for a couple hours before proceeding to the next step. Note: The old battery does not need to be removed from the circuit because it develops a high impedance when it is exhausted.
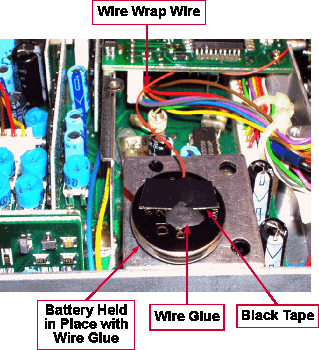
9) Thread the wire so that it comes out on the bottom of the radio next to the VCO box which is next to the 12.80 MHz crystal.
Replacing the Battery

1) Purchase a 3V lithium coin-type battery at home improvement store or Amazon. The particular model uses a Duracell type 2032 which costs a couple of dollars.
2) Referring to the figure , glue the replacement battery so the plus side faces up, on top of the VCO box with a small dab of Wire Glue. Note: Be sure not to apply too much Wire Glue or it may short-out the new battery if the top and bottom are connected with Wire Glue.
Note: Allow the Wire Glue to set for a couple hours before proceeding to the next step.
3) Scrape a small patch on the top of the battery and trim the insulated wire such that it ends at the replacement battery. About 1/4 inch of insulation has been removed from the end of the wire.
4) With a small piece of black vinyl tape, hold down the end of the wire such that the un-insulated end of the wire is over the scraped patch on top of the battery.
5) Apply a small quantity of Wire Glue to bond the end of the wire to the top of the battery.
6) Allow all the glue connections to dry overnight.

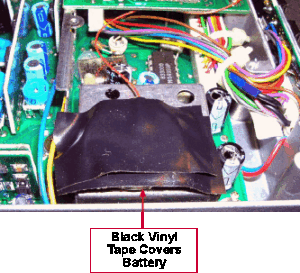
1) As shown in figure on the left, cover the top of the battery with black vinyl electrical tape.
2) Reinstall the front printed circuit board by reinstalling the 4 Phillips head screws.
3) Carefully reattach the sticky-back copper tape which bonds the front circuit board to the case of the radio.
4) Reassemble the radio’s cover and attach the radio to a power supply.
5) Reset the radio’s memory by performing the following steps:
A) Press and hold the F key and the VFO/M key at the same time and turn the power switch off.
B.) Now turn the power switch on again, while still holding the buttons depressed.
C.) Release the buttons and the radio will be reset to the original factory settings.